2011 has been kind to us in many ways, and in some ways not so kind. I just want to focus on the good things that happened this year, and so I'm going to post them in no particular order:
1. Twiggles has decided that having a babysitter isn't such a bad thing and that it's ok for Mama to leave him occasionally to have time alone with daddy.
2. Hubby and I went on our first date in over 3 years without any children. We attended his company Christmas Party.
3. We have taken charge of our health with Young Living Essential Oils, and doing so eliminated my son's need for his harmful asthma medications.
4. We have been trying to eat much better than we used to, and it's working slowly.
5. I have finally begun making friends in the same city as I through my local MOPS group.
6. I enrolled in college, to get a degree that I'll actually use this time.
7. I finished my first college course in 10 years with a 99.28% - the only points I lost were for grammar usage, mostly the forgetting of commas.
8. I found a great ladies Bible Study to participate in, which makes me very happy :)
9. My oldest regained his confidence in reading, and loves it again.
10. I celebrated my 9th wedding anniversary.
11. My baby found a friend :)
12. Hubby and I found friends that are actually in our stage of life (married with children)
13. Our children are becoming young gentlemen.
14. I have learned to listen more to God and less to me.
15. Our winter has thus far been extremely mild and I've not had to turn on the heater yet.
Oh I'm sure there are more but those are the ones I can think of just now. :) So how was your 2011?

Wednesday, December 28, 2011
Saturday, December 24, 2011
Christmas
I love Christmas, I love the lights, the beautiful decorations, the Christmas music,the cookies, the family gathering, the giving, the snow and cold (well, before moving to the desert that is), but most of all I love that Christmas is a celebration! A celebration of the birth of a tiny baby oh, so many years ago! Now I know that Christmas is not the Christ child's actual birth date, but it is the day on which his birth is celebrated and that is just fine with me! I had planned for so many things this year for Christmas, and as plans often do most of them just did not happen. I am sad that so many of the great activities didn't happen, I am sad that our outside decorations never made it up, I am sad that we do not have a large selection of cookies to munch, but most of all I am sad that these things are making me sad.
See, I know, and my children know that Christmas is not about any of these things, they know that the most important thing at Christmas is to remember that God sent his son, as a tiny baby boy, to save the world from their sins! Yet it bothers me that the worldly activities of Christmas have not been completed. Why? Why am I bothered that we neglected certain things? Why am I bothered that instead of these worldly activities I spent time with my children making crafts that we were able to hang in the house, that instead of baking and decorating we chose to snuggle up on the sofa and read Christmas stories each day? I guess I am bothered because I remember my Christmases as a child and I want my children to experience those. Yet I know that I have grown since then, and that what we did do this year was enjoyable for them and that tomorrow morning they will be spoiled just as they always are, that tomorrow morning they will have presents under the tree (which is decorated), that tomorrow morning they will spend hours tearing off paper, oohing and ahhing, and playing with the toys, books, and games that are wrapped and hidden in my closet. Tomorrow morning they will be having so much fun they'll forget to eat breakfast and will be munching cookies on the way to Grandpa and Grandma's house where they will open yet more presents, and play with yet more toys, and eventually sit down to enjoy a wonderful meal with those that love them most!
I feel better already! Just writing this out, and listening to God as I do has made me realize that we really did keep the spirit of Christmas in our hearts, we just chose to do it differently this year, and that's ok.
How did your family spend the days leading up to Christmas? Do tell!
Saturday, October 29, 2011
A New Chapter or Perhaps a Continuation of an Old One?
I have news, I have enrolled in online college classes and will be spending the next 4-6 years working towards the completion of a Bachelor's Degree, and possibly a Master's as well. There is a wide range of time to complete these classes because it may be possible for me to double up on some classes, or I may have to spend my time working through one 5 week course at a time. I am hoping that I will double up on enough classes to complete both degree programs in no more than 5 years, however I am prepared to spend the full 6 doing my classes if I must.
I have several ideas of how I want to put this education to work for me, and the best part is that based on my degree program, and my plan I will be helping to provide for my family financially without having to sacrifice the things that are important to me. I suspect that some of the discussion questions that are assigned each week will likely spark some interesting blog posts, and I am quite excited to get started.
I will be spending the first couple of weeks in an orientation course, and then I will take two introductory courses, and then I get to work on my general education requirements. Some of my courses I am quite looking forward to, as they sound quite fascinating, and I hope that they are just as interesting as I think they will be.
I am quite confident that I will do quite well in my classes. I plan to work on my classes mostly in the evening after my husband gets home from work, and potentially when he is sleeping and I am sitting up trying to sleep. I will sneak my course readings in while my older boys are working on their homeschooling, which can provide me with a great tool for keeping them focuses. I have set up an area in my bedroom where I can have quiet and space to spread out my work and complete assignments, and I have the full support of my husband, who says he will take the children to the park during his days off if I need some quiet time to get a difficult assignment completed.
I am a bit nervous about writing papers though, as the school requires all my work to be in APA format, and I have never before used that format. Thanks to the great expanse of the internet I was able to find lots of information about it, and I am confident that I am teachable and can learn this at least well enough to submit high quality assignments. My school also provides many resources for me, so I believe I have all the information I need, it's just a matter of applying it correctly. I did discover in a quick English Assessment that I really need to brush up on my punctuation skills as I do not put commas in the proper places, and forget semi colons (honestly I don't have the foggiest idea what a semi colon is for other than making smiley faces).
I put this here, because I do best on accomplishing something when I write it out, and tell others...so I am telling all of blogger land! Thank You for listening to me ramble about it.
Tuesday, September 20, 2011
Milk Maid
We have been buying soy milk as of late, because my husband does not do well with dairy and all of our boys seem to have a bit of eczema, which is most often caused by dairy. Well, let me tell you that soy milk is expensive around here it's a bargain if we find soy milk for less than 3.00 a half gallon. After much research online, I discovered that soy milk can be made at home and that is was fairly simple. So I've made it a few times at this point and I thought I'd blog about the process and show some pictures so you can see how easy it is as well!
Step 1 is to purchase all your ingredients. I am using: dried, organic soy beans, brown rice syrup, homemade vanilla extract, and water (I buy filtered water at a water store).

You will also need clean GLASS containers! I can not stress enough that you need to use glass, plastic is too difficult to clean and sanitize, so please, please, please use glass! I am actually using some beautiful glass bottles that once contained an organic lemonade. The jars are simply beautiful and because they are glass with a metal lid they are super easy to clean and I even boiled them to sanitize!

Step 2 is to soak your soy beans. The basic recipe calls for 1/2 cup of dry soy beans soaked in water for 12-24 hours. I personally found that soaking them longer yielded more milk! Here are some before and after photos of the soaked soybeans. Also I find that changing the water at least twice during the soaking offers better flavor to the milk.

Step 3: Take your soaked beans and add them to your blender or food processor with 2 cups of water (my food processor is small, and so I had to do this in two batches). Turn your processor on and blend it for 2 minutes, scraping your bowl down once halfway through.


This mixture will be frothy, foamy, and a bit chunky. Though your chunks need to be VERY small!
Up until now I have been showing measurements for just one recipe, however I actually made 4 times the basic recipe to avoid making milk daily. So from now on I will give you the single recipe measurements, but what you see in pictures will be much larger than your actual results.
Step 4: Place your soy and water puree, along with an additional cup of water into a pot a bit larger than you think you need, as it will foam up! For a regular recipe you could probably get away with a 2 quart saucepan, I am using a large stock pot because again I am making 4 TIMES the basic recipe! So your soy is in a large pot and you now need to bring it to a boil over medium-high heat.
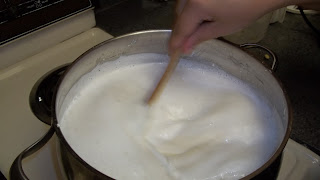
As you can see there will be quite a bit of foam on top of your milk. It is a good idea at this point to have a cup of cold water on hand in case the foam gets out of control, if you don't need it you can add it to the pot after it comes to a full boil. Be sure to add this water into your pot once it comes to a boil if you didn't need it to control foam.


Step 6: Pour your simmered milk into a cheese cloth (or towel) lined strainer/colander over a container large enough to hold your finished milk. Allow this to drain and cool for 20 minutes (or more if it's still too hot).

Step 7: Pull up your corners and squeeze out the rest of your milk. I switched to another pot at this point just so you could see how much milk I got out of the squeezing process.

See how much extra milk was still in that puree?

Step 8: Sweeten and flavor your milk if desired, I am using 1 Tablespoon of brown rice syrup, and 1 teaspoon of home made vanilla extract. Then pour your milk into your GLASS containers.


And now you can refrigerate your freshly made, preservative free soy milk and enjoy as you please. It will stay fresh in your refrigerator for 3 days, I wouldn't try and keep it much beyond that because remember it is a fresh product and there are no preservatives!

My finished milk. Isn't it pretty? My family loves this fresh milk, and to us all it tastes so much better than the store bought containers of milk. Oh, and the even better part? When I figured it all out, to make 3 liters of milk it only costs me $1.74! That is a savings of nearly half the cost of store bought containers that also contain refined sugar, preservatives and sometimes even artificial flavors!
OK! So for those of you who prefer a simple recipe I'm going to post that below so that you don't have to filter through my step by step photo tutorial.
Homemade soy milk:
1/2 cup dry organic soybeans
4 cups of water
1 Tablespoon brown rice syrup, honey, or any sweetener of your choice (you can also omit this if you like)
1 teaspoon of vanilla extract (again optional)
Soak your soybeans for 12 -24 hours, the longer you soak them the more milk you will get! Remember to change the water twice during the soaking process!
After soaking your beans drain them and put them in your blender or food processor along with 2 cups of water and whip it around for 2 minutes. Scrape your container down halfway through the pureeing.
Put this mixture in a large pot with another cup of water. Turn it on medium high heat and bring it to a boil. If it threatens to boil over add a cup of cold water to stop this, if it doesn't try to boil over add the cup of water after it comes to a boil.
Reduce the heat to medium - medium low and simmer for 20 minutes.
Set a colander/strainer over a medium pot or stainless steel bowl and line the colander with cheese cloth, or a clean cotton dish towel. Pour the simmered mixture over this and allow it to drain and cool for at least 20 minutes or until it is cool enough to handle.
Bring up the corners of the towel and squeeze any excess milk from the Okara (that's the ground soybean that is left after milk making, and it is edible and full of protein!) and then sweeten and flavor your milk if desired. Pour your milk into clean glass containers and refrigerate for up to 3 days!
Birbitt thinks that making soy milk is fun, and nutritious! What more could a mama want for her children?
Step 1 is to purchase all your ingredients. I am using: dried, organic soy beans, brown rice syrup, homemade vanilla extract, and water (I buy filtered water at a water store).

You will also need clean GLASS containers! I can not stress enough that you need to use glass, plastic is too difficult to clean and sanitize, so please, please, please use glass! I am actually using some beautiful glass bottles that once contained an organic lemonade. The jars are simply beautiful and because they are glass with a metal lid they are super easy to clean and I even boiled them to sanitize!

Step 2 is to soak your soy beans. The basic recipe calls for 1/2 cup of dry soy beans soaked in water for 12-24 hours. I personally found that soaking them longer yielded more milk! Here are some before and after photos of the soaked soybeans. Also I find that changing the water at least twice during the soaking offers better flavor to the milk.

Step 3: Take your soaked beans and add them to your blender or food processor with 2 cups of water (my food processor is small, and so I had to do this in two batches). Turn your processor on and blend it for 2 minutes, scraping your bowl down once halfway through.


This mixture will be frothy, foamy, and a bit chunky. Though your chunks need to be VERY small!
Up until now I have been showing measurements for just one recipe, however I actually made 4 times the basic recipe to avoid making milk daily. So from now on I will give you the single recipe measurements, but what you see in pictures will be much larger than your actual results.
Step 4: Place your soy and water puree, along with an additional cup of water into a pot a bit larger than you think you need, as it will foam up! For a regular recipe you could probably get away with a 2 quart saucepan, I am using a large stock pot because again I am making 4 TIMES the basic recipe! So your soy is in a large pot and you now need to bring it to a boil over medium-high heat.

As you can see there will be quite a bit of foam on top of your milk. It is a good idea at this point to have a cup of cold water on hand in case the foam gets out of control, if you don't need it you can add it to the pot after it comes to a full boil. Be sure to add this water into your pot once it comes to a boil if you didn't need it to control foam.

Step 5: Once your mixture comes to a full boil, back the heat down to medium - medium low and allow it to simmer for 20 minutes. Set your timer because this is crucial, 20 minutes. Stirring occasionally to prevent the Okara from sticking. During this time a thin layer of film may form, do not stir that into your milk, just skim it off!

Step 6: Pour your simmered milk into a cheese cloth (or towel) lined strainer/colander over a container large enough to hold your finished milk. Allow this to drain and cool for 20 minutes (or more if it's still too hot).

Step 7: Pull up your corners and squeeze out the rest of your milk. I switched to another pot at this point just so you could see how much milk I got out of the squeezing process.

See how much extra milk was still in that puree?

Step 8: Sweeten and flavor your milk if desired, I am using 1 Tablespoon of brown rice syrup, and 1 teaspoon of home made vanilla extract. Then pour your milk into your GLASS containers.


And now you can refrigerate your freshly made, preservative free soy milk and enjoy as you please. It will stay fresh in your refrigerator for 3 days, I wouldn't try and keep it much beyond that because remember it is a fresh product and there are no preservatives!

My finished milk. Isn't it pretty? My family loves this fresh milk, and to us all it tastes so much better than the store bought containers of milk. Oh, and the even better part? When I figured it all out, to make 3 liters of milk it only costs me $1.74! That is a savings of nearly half the cost of store bought containers that also contain refined sugar, preservatives and sometimes even artificial flavors!
OK! So for those of you who prefer a simple recipe I'm going to post that below so that you don't have to filter through my step by step photo tutorial.
Homemade soy milk:
1/2 cup dry organic soybeans
4 cups of water
1 Tablespoon brown rice syrup, honey, or any sweetener of your choice (you can also omit this if you like)
1 teaspoon of vanilla extract (again optional)
Soak your soybeans for 12 -24 hours, the longer you soak them the more milk you will get! Remember to change the water twice during the soaking process!
After soaking your beans drain them and put them in your blender or food processor along with 2 cups of water and whip it around for 2 minutes. Scrape your container down halfway through the pureeing.
Put this mixture in a large pot with another cup of water. Turn it on medium high heat and bring it to a boil. If it threatens to boil over add a cup of cold water to stop this, if it doesn't try to boil over add the cup of water after it comes to a boil.
Reduce the heat to medium - medium low and simmer for 20 minutes.
Set a colander/strainer over a medium pot or stainless steel bowl and line the colander with cheese cloth, or a clean cotton dish towel. Pour the simmered mixture over this and allow it to drain and cool for at least 20 minutes or until it is cool enough to handle.
Bring up the corners of the towel and squeeze any excess milk from the Okara (that's the ground soybean that is left after milk making, and it is edible and full of protein!) and then sweeten and flavor your milk if desired. Pour your milk into clean glass containers and refrigerate for up to 3 days!
Birbitt thinks that making soy milk is fun, and nutritious! What more could a mama want for her children?
Saturday, September 10, 2011
Review - God's Love Letters to You

This book review is for God's Love Letters to You by Dr. Larry Crabb.
This is a 40 day devotional and each day offers the reader a Bible passage, short devotional (in this case written in the form of a letter from God), reflection questions and then a prayer. Each day is based on a single book of the Bible, and the letter is basically a summary of what God would have us to learn from that book, then the reflection questions ask us to think about our lives and how we can relate the devotion to our lives.
Personally I did not like this book as much as I had hoped I would. That is not to say I didn't like it and I didn't learn from it, I just wasn't as impressed as I hoped to be. I think the problem for me is that my idea of a devotional differs from most people. I prefer my devotional to be more like a mini-Sunday School lesson, something that is instructional, yet though provoking, and something that will keep me thinking the rest of the day. This particular devotional was more emotional, in that the reflection was often more about feelings, and emotions than actual actions. Overall I found it to be a bit watery, and it wasn't a book I would use for devotions because it didn't provoke the thought I look for in a devotion. I found myself reading the whole book in just a couple of hours so that I could finish and move on to another devotional. I did enjoy reading it, just not as a devotional.
As I said though, I look for something different in a devotional, I like my devotionals to leave me feeling spiritually fed and thinking about the reading throughout my day, this one just didn't do that for me. However, I know that many people prefer a more emotional experience in their devotions and for those people I think this would be a great book!
Obligatory Disclaimer: I was provided a free copy of this book from BookSneeze in exchange for my honest review of the book. I was not told what to write, nor was I told I had to write a favorable review. The opinions in this review are strictly my own, and my only compensation was the free copy of the book.
Thursday, July 21, 2011
New twist on an old favorite
I do not normally post recipes, but this one is so simple, and anyone whom I've served it to just loves it, so maybe you all will enjoy it as well.
Growing up where I did Polish and Polish inspired foods were very common, and we ate a lot of them. To this day I still love many of those same dishes, and one such favorite is stuffed cabbage. I love stuffed cabbage, though I must admit as a child I thought it left much to be desired! Now if you've never made stuffed cabbage before you probably don't know that it's a very long process, and you are going to burn your fingers, and frankly it's a real pain in the hind end.
Living in the Southwest, there just isn't anywhere to purchase these treasures of my childhood so if I want them I have to make them! I personally refuse to make stuffed cabbage simply because I don't have the time to dedicate to boiling, and stuffing, and rolling, and baking just to get one meal on the table. What I do have however, is a crock pot, about 20 minutes, and all the same ingredients (or reasonable facsimiles thereof). So for anyone interested, here is the recipe. For anyone trying to stay away from prepackaged foods try this as a substitution for the canned soup, though your results will be less sweet than my own. I am not sure what to call this recipe, so it currently has no name, feel free to suggest one in the comments. :) I have also included my prices so you can see how inexpensive this meal really is, your prices may be higher or lower depending on region.
Ingredients:
1 3-4lb head of green cabbage (.39 per pound, total 1.32 for 3.39lbs)
1 - 1 1/2 pounds of lean ground beef, or any other lean ground meat (1.99)
1 egg (.08)
1/2 of a large red onion diced fine (.15)
1/2 - 1 cup of uncooked white rice (.33)
1 12 ounce can of tomato paste (.78)
2 cans of condensed tomato soup (1.84 for Campbell's brand)
Salt and Pepper
Garlic powder
1 - 1 1/2 cans of water
Total cost: $6.49 and this will feed my family of 5 for dinner with enough leftover for lunch later in the week!! I may spend slightly more if I serve it with salad and bread, though most of the time we just eat the cabbage and meatballs.
In a bowl mix the ground beef, egg, onion, rice, salt, pepper, and garlic powder. Form into 1 inch meatballs.
Remove the core from the cabbage, then slice the cabbage into 1 inch by 2 inch pieces
In a bowl combine the soup, tomato paste, and enough water to thin the mixture to somewhere between the consistency of whole milk and heavy cream.
Then in your crock pot put a thin layer of the sauce, followed by cabbage, then some meatballs, then sauce, cabbage, meatballs, continue until you have use all of the sauce, cabbage and meatballs. Turn on your crockpot (I use the high setting, though your crockpot may be better than mine and low will be just fine) and cook for 6-8 hours.
Basically this tastes exactly like the stuffed cabbage I ate growing up, just without the added hassle of boiling cabbage and trying to stuff the steaming hot leaves.
I hope you enjoy this one. It makes a great meal on a hot day because I don't have to use my stove or oven.
Thursday, June 16, 2011
Book Review

Have you ever had one of those days, you know those days where it seems nothing is going your way, those days where it seems God is just too busy tending to others to be concerned about your problems? I know I have had plenty of days where it seems it would just be easier to go back to bed rather than face what the world has for me that day.
That is where this book comes in! Voices of the Faithful with Beth Moore, compiled by Kim P. Davis is an amazing devotional. You could easily read it as it was designed, one page per day as a morning devotional to give you inspiration and strength to get out of bed and get on with your day. Many days though I found myself so wrapped up in the stories that are told in that one little page that I just couldn't put it down, I didn't want to stop reading it. So here I am only 6 months into the year and finished with the book.
Each and every page is filled with a story from someone doing things for God in places where doing things for God gets one in hot water, stories of salvation, of service, stories of purpose designed to lift us up, give us a reason to go on, and sometimes make us feel just a little foolish for worrying about our own minor (in the grand scheme of things) troubles when others are dying simply because they believe in our creator, our Heavenly Father, our Lord of lords and King of kings. As I read these pages, so many things jumped out at me, things that to me seem so everyday like reading my Bible, but those in these stories are risking the safety of their families simply by owning a Bible. It makes me thankful to live where I do, and to have the freedom to believe as I choose, without fear that my home will be burned down while we sleep, or that my children will be beaten simply for praying.
Voices of the Faithful is one of those books that makes you thankful for what you have and happy for where you are, and at the same time it makes you sad to think that others don't have the freedom you have, and sometimes it even makes you feel just a bit guilty for wanting so much, when you are already so very very blessed.
I very much enjoyed the stories of hope, healing, and courage and think that you will too. This is a great book to put in the car and pull out to read a page or two while you are waiting for you children at school, day camp, or kids club, or even to toss in the diaper bag and sneak in a page or two at the checkout line, or while waiting in the doctors office. I enjoyed reading it while sitting on the patio having my morning coffee or tea, while the children had breakfast or did their morning chores.
The Fine Print: I am required by the FTC to inform you that I did receive in exchange for my honest review a free copy of Voices of the Faithful from BookSneeze. If you'd like to get your own free books to review please check out www.booksneeze.com, or just click the link in my sidebar. The opinions in this review are my own, and I was only given the free copy of the book, no other compensation was provided or offered.
Subscribe to:
Comments (Atom)