As we started to research, and read, and discover information we realized that our drinks such as milk and juice and *gasp* kool-aid really weren't drinks at all. They are food, in liquid form and if we wanted to be healthy we need to see our drinks as food. So we made a new rule, that water was the only beverage we would drink unless it was a meal or snack time and then we could choose to have something else as part of the meal.
Of course some of our beverages are no longer a regular option. Soda, Kool-aid, and other sugary drinks aren't offered except on rare special occasions and even then we look for a healthier option. Sodas now are either sparkling mineral water with flavored stevia added in, or a soda such as Hansen's that is made with pure cane sugar instead of processed white sugar or artificial sweeteners. Our sweetener of choice is now Stevia, and our go to beverages are iced tea, lemonade, and natural fruit juices.
We have also changed our stance on milk. I used to believe that milk was a necessary thing for a young child to grow and develop as they should, of course I now know that is not exactly true. I will not bore you with all the reasons we should not drink milk, but I will give you one thing to think about. If breastmilk is considered the perfect food for human babies, would it not follow that cow's milk is the perfect food for cow babies? Then why would we a) take the milk away from the cow babies (google the dairy industry, what you learn my shock you) and b) give cow food to our human children?
Now since my children have been accustomed to receiving cow milk with their dinner, and Twiggles is accustomed to a drink of milk before bed I could not take away the milk without replacing it with something. That something is Almond milk, Coconut milk, Oat milk, Rice milk, Sunflower milk, Hazelnut milk, and sometimes soy milk (though I must admit soy sometimes scares me and I personally can't drink it). These drinks are FOOD! They provide nourishment, and vitamins and minerals.
Remembering this helps me to keep my food intake in check. I remind myself that if I have a glass of juice, I won't be thirsty but I will probably still be hungry so I will instead drink water with a few drops of Young Living essential oil added in to flavor and give added benefits, and have a light snack such as a piece of fruit or a handful of raw veggies.
So our everyday drink is now water. With meals we may have tea, lemonade, juice, or non-dairy milk, and snacks may come with water or juice or milk depending on what is offered. I have noticed a big difference in my children this way, they aren't quite so hyper and crazy, they sleep better, and little Twiggles he is actually eating meals!
Birbitt thinks that what seems like a small change really can have big effects!

Showing posts with label drinks. Show all posts
Showing posts with label drinks. Show all posts
Saturday, August 4, 2012

Tuesday, September 20, 2011
Milk Maid
We have been buying soy milk as of late, because my husband does not do well with dairy and all of our boys seem to have a bit of eczema, which is most often caused by dairy. Well, let me tell you that soy milk is expensive around here it's a bargain if we find soy milk for less than 3.00 a half gallon. After much research online, I discovered that soy milk can be made at home and that is was fairly simple. So I've made it a few times at this point and I thought I'd blog about the process and show some pictures so you can see how easy it is as well!
Step 1 is to purchase all your ingredients. I am using: dried, organic soy beans, brown rice syrup, homemade vanilla extract, and water (I buy filtered water at a water store).

You will also need clean GLASS containers! I can not stress enough that you need to use glass, plastic is too difficult to clean and sanitize, so please, please, please use glass! I am actually using some beautiful glass bottles that once contained an organic lemonade. The jars are simply beautiful and because they are glass with a metal lid they are super easy to clean and I even boiled them to sanitize!

Step 2 is to soak your soy beans. The basic recipe calls for 1/2 cup of dry soy beans soaked in water for 12-24 hours. I personally found that soaking them longer yielded more milk! Here are some before and after photos of the soaked soybeans. Also I find that changing the water at least twice during the soaking offers better flavor to the milk.

Step 3: Take your soaked beans and add them to your blender or food processor with 2 cups of water (my food processor is small, and so I had to do this in two batches). Turn your processor on and blend it for 2 minutes, scraping your bowl down once halfway through.


This mixture will be frothy, foamy, and a bit chunky. Though your chunks need to be VERY small!
Up until now I have been showing measurements for just one recipe, however I actually made 4 times the basic recipe to avoid making milk daily. So from now on I will give you the single recipe measurements, but what you see in pictures will be much larger than your actual results.
Step 4: Place your soy and water puree, along with an additional cup of water into a pot a bit larger than you think you need, as it will foam up! For a regular recipe you could probably get away with a 2 quart saucepan, I am using a large stock pot because again I am making 4 TIMES the basic recipe! So your soy is in a large pot and you now need to bring it to a boil over medium-high heat.
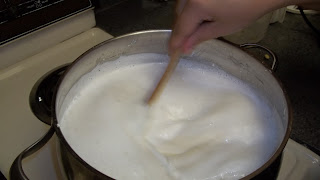
As you can see there will be quite a bit of foam on top of your milk. It is a good idea at this point to have a cup of cold water on hand in case the foam gets out of control, if you don't need it you can add it to the pot after it comes to a full boil. Be sure to add this water into your pot once it comes to a boil if you didn't need it to control foam.


Step 6: Pour your simmered milk into a cheese cloth (or towel) lined strainer/colander over a container large enough to hold your finished milk. Allow this to drain and cool for 20 minutes (or more if it's still too hot).

Step 7: Pull up your corners and squeeze out the rest of your milk. I switched to another pot at this point just so you could see how much milk I got out of the squeezing process.

See how much extra milk was still in that puree?

Step 8: Sweeten and flavor your milk if desired, I am using 1 Tablespoon of brown rice syrup, and 1 teaspoon of home made vanilla extract. Then pour your milk into your GLASS containers.


And now you can refrigerate your freshly made, preservative free soy milk and enjoy as you please. It will stay fresh in your refrigerator for 3 days, I wouldn't try and keep it much beyond that because remember it is a fresh product and there are no preservatives!

My finished milk. Isn't it pretty? My family loves this fresh milk, and to us all it tastes so much better than the store bought containers of milk. Oh, and the even better part? When I figured it all out, to make 3 liters of milk it only costs me $1.74! That is a savings of nearly half the cost of store bought containers that also contain refined sugar, preservatives and sometimes even artificial flavors!
OK! So for those of you who prefer a simple recipe I'm going to post that below so that you don't have to filter through my step by step photo tutorial.
Homemade soy milk:
1/2 cup dry organic soybeans
4 cups of water
1 Tablespoon brown rice syrup, honey, or any sweetener of your choice (you can also omit this if you like)
1 teaspoon of vanilla extract (again optional)
Soak your soybeans for 12 -24 hours, the longer you soak them the more milk you will get! Remember to change the water twice during the soaking process!
After soaking your beans drain them and put them in your blender or food processor along with 2 cups of water and whip it around for 2 minutes. Scrape your container down halfway through the pureeing.
Put this mixture in a large pot with another cup of water. Turn it on medium high heat and bring it to a boil. If it threatens to boil over add a cup of cold water to stop this, if it doesn't try to boil over add the cup of water after it comes to a boil.
Reduce the heat to medium - medium low and simmer for 20 minutes.
Set a colander/strainer over a medium pot or stainless steel bowl and line the colander with cheese cloth, or a clean cotton dish towel. Pour the simmered mixture over this and allow it to drain and cool for at least 20 minutes or until it is cool enough to handle.
Bring up the corners of the towel and squeeze any excess milk from the Okara (that's the ground soybean that is left after milk making, and it is edible and full of protein!) and then sweeten and flavor your milk if desired. Pour your milk into clean glass containers and refrigerate for up to 3 days!
Birbitt thinks that making soy milk is fun, and nutritious! What more could a mama want for her children?
Step 1 is to purchase all your ingredients. I am using: dried, organic soy beans, brown rice syrup, homemade vanilla extract, and water (I buy filtered water at a water store).

You will also need clean GLASS containers! I can not stress enough that you need to use glass, plastic is too difficult to clean and sanitize, so please, please, please use glass! I am actually using some beautiful glass bottles that once contained an organic lemonade. The jars are simply beautiful and because they are glass with a metal lid they are super easy to clean and I even boiled them to sanitize!

Step 2 is to soak your soy beans. The basic recipe calls for 1/2 cup of dry soy beans soaked in water for 12-24 hours. I personally found that soaking them longer yielded more milk! Here are some before and after photos of the soaked soybeans. Also I find that changing the water at least twice during the soaking offers better flavor to the milk.

Step 3: Take your soaked beans and add them to your blender or food processor with 2 cups of water (my food processor is small, and so I had to do this in two batches). Turn your processor on and blend it for 2 minutes, scraping your bowl down once halfway through.


This mixture will be frothy, foamy, and a bit chunky. Though your chunks need to be VERY small!
Up until now I have been showing measurements for just one recipe, however I actually made 4 times the basic recipe to avoid making milk daily. So from now on I will give you the single recipe measurements, but what you see in pictures will be much larger than your actual results.
Step 4: Place your soy and water puree, along with an additional cup of water into a pot a bit larger than you think you need, as it will foam up! For a regular recipe you could probably get away with a 2 quart saucepan, I am using a large stock pot because again I am making 4 TIMES the basic recipe! So your soy is in a large pot and you now need to bring it to a boil over medium-high heat.

As you can see there will be quite a bit of foam on top of your milk. It is a good idea at this point to have a cup of cold water on hand in case the foam gets out of control, if you don't need it you can add it to the pot after it comes to a full boil. Be sure to add this water into your pot once it comes to a boil if you didn't need it to control foam.

Step 5: Once your mixture comes to a full boil, back the heat down to medium - medium low and allow it to simmer for 20 minutes. Set your timer because this is crucial, 20 minutes. Stirring occasionally to prevent the Okara from sticking. During this time a thin layer of film may form, do not stir that into your milk, just skim it off!

Step 6: Pour your simmered milk into a cheese cloth (or towel) lined strainer/colander over a container large enough to hold your finished milk. Allow this to drain and cool for 20 minutes (or more if it's still too hot).

Step 7: Pull up your corners and squeeze out the rest of your milk. I switched to another pot at this point just so you could see how much milk I got out of the squeezing process.

See how much extra milk was still in that puree?

Step 8: Sweeten and flavor your milk if desired, I am using 1 Tablespoon of brown rice syrup, and 1 teaspoon of home made vanilla extract. Then pour your milk into your GLASS containers.


And now you can refrigerate your freshly made, preservative free soy milk and enjoy as you please. It will stay fresh in your refrigerator for 3 days, I wouldn't try and keep it much beyond that because remember it is a fresh product and there are no preservatives!

My finished milk. Isn't it pretty? My family loves this fresh milk, and to us all it tastes so much better than the store bought containers of milk. Oh, and the even better part? When I figured it all out, to make 3 liters of milk it only costs me $1.74! That is a savings of nearly half the cost of store bought containers that also contain refined sugar, preservatives and sometimes even artificial flavors!
OK! So for those of you who prefer a simple recipe I'm going to post that below so that you don't have to filter through my step by step photo tutorial.
Homemade soy milk:
1/2 cup dry organic soybeans
4 cups of water
1 Tablespoon brown rice syrup, honey, or any sweetener of your choice (you can also omit this if you like)
1 teaspoon of vanilla extract (again optional)
Soak your soybeans for 12 -24 hours, the longer you soak them the more milk you will get! Remember to change the water twice during the soaking process!
After soaking your beans drain them and put them in your blender or food processor along with 2 cups of water and whip it around for 2 minutes. Scrape your container down halfway through the pureeing.
Put this mixture in a large pot with another cup of water. Turn it on medium high heat and bring it to a boil. If it threatens to boil over add a cup of cold water to stop this, if it doesn't try to boil over add the cup of water after it comes to a boil.
Reduce the heat to medium - medium low and simmer for 20 minutes.
Set a colander/strainer over a medium pot or stainless steel bowl and line the colander with cheese cloth, or a clean cotton dish towel. Pour the simmered mixture over this and allow it to drain and cool for at least 20 minutes or until it is cool enough to handle.
Bring up the corners of the towel and squeeze any excess milk from the Okara (that's the ground soybean that is left after milk making, and it is edible and full of protein!) and then sweeten and flavor your milk if desired. Pour your milk into clean glass containers and refrigerate for up to 3 days!
Birbitt thinks that making soy milk is fun, and nutritious! What more could a mama want for her children?
Subscribe to:
Posts (Atom)